The Interface
It is located at the top of the interface 
lt is located just below the menu bar 
Collection Pane allow hiearchial organization of items into groups and subgroups.
It is important to understand that items can belong to multiple collections and subcollections. Adding an item to multiple collections and subcollections. Adding an item to multiple collections does not duplicate the item

How to Create a Collection?
Right click on "My Library" and choose "New Collection" 
The new collection will appear as a folder under My Library.
How to Create a Subcollection?
Creating a "New Subcollection" is almost same. Right click on a collection and choose "New Subcollection"
If you want a rename a collection and/or a subcollection, right click on them and choose "Rename Collection"
Deleting Collections
To delete a collection from "My Library", right click on the collection and choose "Delete Collection" Deleting a collection does not delete the items
in the collection. Items are still accessible by clicking on "My Library".
To delete both the collection and its items right click on the collection and choose "Delete Collection and Items"

This is the pane where the items in "My Library" are listed. The items in this area can be viewed upon request.

Quick Search, Advanced Search and Saved Search
Quick Search can be used in three different modes:
- "Title, Creator, Year"

- "All Fields and Tags"

- "Everything"

Title, Creator, Year-matches against these three fields, as well as publication titles
All Fields and Tags-matches against all fields, as well as tags and text in notes
Everything-matches against all fields, tags, text in notes, and indexed text in PDFs (this requires that PDF indexing be enabled)
Advanced Search
Advanced search offer more and finer control than quick searches and allow the users to make saved searches.
 To open the Advanced Search window, click on the magnifying glass icon at the top of the center pane.

In this window, you can filter items by the content of specific fields or by other properties, like item type or the collection an item belongs to. Multiple filters can be set up by clicking the plus button.

Set the library to search in by using the “Search in libary:” option at the top of the window. It is not currently possible to search in multiple libraries at one time.
By default, items only show up in the search results if they satisfy all search criteria. To change the search so that all items matching at least one criterion are returned, change the “Match” option to “any”.
You can filter items by the collections or saved searches they belong to by searching by “Collection”. To include items in subcollections of matching collections in the search results, check “Search subcollections”.
To hide non-matching parent items with child items that do match the search criteria, and to collapse matching parent items with matching child items, check “Show only top-level items”.
To match search criteria against both parent items and their children, check “Include parent and child items of matching items”. If this option is selected and “Match” is set to “all”, parent/child items will still show up if just part of the criteria is met by the parent item and the other part by a child item.
Saved Search
When you save an Advanced Search, it appears as a collection in your library (but with a Saved Search icon, ![]()
 , instead of the regular collection icon). Saved Searches are continuously updated. For example, if you set up a Saved Search for “Date Added” “is in the last” “7” “days”, the saved search will always show the items that have been added in the last 7 days. Saved searches only store the search criteria, not the search results.
To save a search, click the “Save Search” button in the Advanced Search window and provide a name for the search. Saved searches can be edited or deleted by right-clicking the Saved Search and selecting “Edit Saved Search…” or “Delete Saved Search…”, respectively.
You can also create a saved search in a library by right-clicking on the library name and choosing “New Saved Search…”.
It is located in the right column. In the list of items contains detailed identification information of a selected items, and this is the pane where data is defined.
There are 4 subsections under this pane:
- Info
- Notes
- Tags
- Related
Info shows the items detailed informations.
Notes allow users also store notes in the Zotero library: child notes, which belong to a specific item, and standalone notes. Notes are synced along with item metadata; they don't count against your Zotero file storage quota. Notes are searchable and support HTML formatting (Zotero uses the TinyMCE HTML editor for note editing).
- Child Notes
To create a child note, select an item in the center pane. Then, either click the “New Note” button at the top of the center pane ( ) and select “Add Child Note”, or go to the “Notes” tab in the right-hand pane and click the “Add” button. You can also right-click an item and select “Add Note”.
A note will be created as an attachment to the item (it will also show up under the “Notes” tab), and a note editor will appear in the right-hand pane. You can create a dedicated window for the note editor by clicking the “Edit in a separate window” button at the bottom of the editor. Text in notes is saved as you type.
- Standalone Notes
Standalone notes work the same as child notes, but are not directly related to any item in your library. Standalone notes will appear alongside any other items in your library. To create a standalone note, click the “New Note” () button and select “New Standalone Note”.
Tags
To add a tag to an item, select the item in the center Zotero pane, and then click the Tags tab in the right-hand pane. Click the Add button, type the tag name, and type Enter/Return. You can rename a tag by clicking on it and typing the new name. Once you have added the tag it will also appear in the tag selector in the bottom left.
As you type, you will be shown a list of matching existing tags. You can choose a suggested tag using the up and down arrow keys and insert it by pressing Tab or Enter/Return.
You can also drag items to a tag in the tag selector in the bottom left to quickly add the tag to all of those items.
(More information in The Tag Selector)
Related
to express relationships between items is by setting up “relations”. Relations can set up between any pair of items in a library (it is not possible to relate items from different libraries).
To create a relation, select an item in the center pane and go to the “Related” tab of the right pane. Click the “Add” button, and select one or more items from the same library in the pop-up window (hold down Ctrl or Shift [Windows/Linux] or Cmd or Shift [Mac] to select multiple items) and click “OK”. The selected items will now show up as related items in the “Related” tab, and clicking an item will take you straight to that item.
With the Zutilo plugin, you can also select multiple items in the center pane, then right-click and choose “Related selected items” to related all selected items to each other in one click.
Note that when you relate item A to B, B will be automatically related to A. But relations are not transitive: relating A to B, and B to C, will not automatically relate A to C.
Some suggestions of how you could use this feature:
-
connect book chapters to their parent volume
-
connect book reviews to the book reviewed
-
connect different versions of a work (e.g., connecting a conference presentation that eventually became an article that eventually became a book)
-
link associated items from different collections
-
link items that form parts of a single work (e.g., articles in a series)
-
connect standalone notes to the items they discuss
-
link one item to another discussed in the Abstract or Notes fields
-
link items that have similar comments in the Abstract or Notes fields
The tag selector is located at the bottom of the left Zotero pane. It shows all the tags that have been assigned to the items currently shown in the center pane (i.e., items in the currently selected collection that match the current search). To show all of the tags present in the library, click the multi-color button in the lower-right corner of the tag selection and choose “Display All Tags in This Library”. Tags not assigned to currently shown items are greyed out. You can filter items by their tags by clicking on one more tags in the tag selector. Only items that have all of the selected tags will be shown in the center pane. As you apply filters, the list of tags in the tag selector will be updated to show only the tags assigned to currently visible items. Clicking on a tag a again will deselect it. To deselect all tags at once, click the multi-color button and choose “Deselect All”.

Adding Tags to Items
To add a tag to an item, select the item in the center Zotero pane, and then click the Tags tab in the right-hand pane. Click the Add button, type the tag name, and type Enter/Return. You can rename a tag by clicking on it and typing the new name. Once you have added the tag it will also appear in the tag selector in the bottom left.
As you type, you will be shown a list of matching existing tags. You can choose a suggested tag using the up and down arrow keys and insert it by pressing Tab or Enter/Return.
You can also drag items to a tag in the tag selector in the bottom left to quickly add the tag to all of those items.
Colored Tags
Colored tags appear as small colored squares next to items' titles in the center pane. Colored tags make it easy to quickly scan your library for tags that have a certain tag. Colored tags are shown at the top of the tag selector and are always visible, even if not assigned to any visible items.
Many people use colored tags for “to read” or “favorite” items. They can even contain emojis (e.g., ⭐️ for favorites).
You can assign a color to a tag by right-clicking on it and choosing “Assign Color…” In the popup window, select a color from the dropdown box and click “Set Color”. You can remove a color from a tag by right-clicking, choosing “Assign Color…”, and clicking “Remove Color”.
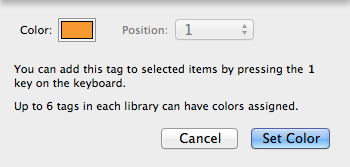
Each colored tag is also assigned a number, corresponding to its position at the top of the tag selector. You can quickly add or remove a colored tag from selected items by typing the corresponding number key on your keyboard. You can change a colored tag's number by right-clicking on it, choosing “Assign Color…”, and choosing a new position.
Zotero Interface
